It Prints!
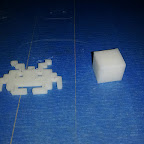
Another success. The Reprap prints!
The hotend was the last piece of the puzzle. I managed to get the new one built, installed and extruding well thankfully. Next came trying to get a decent print out of it, but this is easier said than done. Calibration of the Z axis is very tricky with very little room for tolerance, especially if you haven’t got a heated bed. Getting the first layer to stick is a case of having the nozzle extremely close to the bed of the printer, so much so that it extrudes and forces the plastic into the bed. I managed to get the two objects off pictured above and the quality is rather good for a first attempt. Still, there is a lot of room for improvement. The X axis needed a lot of tightening up (my first print was actually a belt tensioner), but that was easily accomplished with zip ties to tighten the grip of the carriage with the bearings on the smooth rod.
Next step was to get the heated bed working. After some talk on the forums, it was suggested by a guy called nophead to replace the standard MOSFET with one better suited. After ordering one from RS and replacing it, the heated bed worked without melting the electronics, just. It was still getting very hot, and still needs either a cooling fan or a heatsink. In the process of swapping the MOSFETS I’ve made a bit of a mess of the circuit board, with some of the tracks lifting off and breaking. Some hasty cludge repairs were needed and the bottom of the board looks a bit of a mess, but at least it works. With the heated bed working and running at 100 degrees, laying down the first layer has become a lot easier. The first layer finish is a lot better too, a nice shiny flat surface. I did have to print out some corner supports for the heated bed to try and cut down on the vibrations due to the bed wobbling. The other benefit of a heated bed is that it stops warping. I tried a few larger prints without it, and after a few layers the corners would lift off the bed due to thermal contraction and ruin the entire print.
The Y axis is also a bit loose, similar to the X axis issue, with the bearing holders having quite a bit of play in them. Unfortunately, it isn’t quite as quick a fix as the X axis, as there is nowhere to put the cable ties. I’ve got some new bearing holders printed now to replace them. Just have to wait for the printer to cool down.
There are still a few more things that I need do before I have reliable prints:
- New extruder. Something with a filament guide on top will be better. The filament slides off the hobbed bolt on occasion which stops anything being extruded. Very bad!
- Spool holder. I need something to hang the spool on to allow it to unroll smoothly.
- Electronics holder. The wiring is a mess and I’ve seen a nice electronics tray that will hold the circuit board and allow me to trim the wires down to a better (and tidier) length.
- Z Axis stabilisers. Not sure if this is really necessary, I’m not seeing much wobble in the Z, but I may as well put them on there for completeness sake.
Of course, once the reliable prints are coming off, I may be able to reprint some parts and get the Huxley to work too!
However, the mechanical part of the printer is not the only bit that needs tweaking. Slicing the models is another area that needs a lot of work. This defines the layer height, the speed, amount of extrusion, amount of infill, etc. I’m slowly getting things homed in to a good quality at a fast enough speed that I’m not waiting for days for a print.
I’ve already had a few requests for things to be printed, and I’ve got a whole list of them too. I’m off for two weeks soon, and have a bit more filament on order, so I should hopefully have everything stable, tweaked, and reliable very soon!

Leave a Reply