Reprap update
So, been a while since I’ve done any updates, but then I’ve been a little busy recently. Since my last post I’ve been in the states working again. This time, not only Washington, but Boston too. Anyway, not much to talk about on that, just lots of flying and propping up bars in hotels.
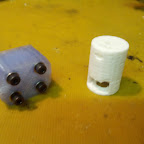
As for my printer, I’ve made some significant progress with that. Firstly, the discovery is that PLA is so much easier to print with than ABS which is what I’ve been using so far. It sticks better to the bed, especially with a heated one, and doesn’t contract anywhere near as much when printing out large pieces, which means a lot less warping. I’m now getting fairly reliable prints out, with only a couple of mechanical issues left to deal with. I’ve printed a few enhancements to the design, the latest being a new Z coupler as the ones I was using had a tendency to slip off the stepper motor. The new one uses captive nuts and grubs screws to hold onto the shaft of the motor.
I’ve also printed some Z axis stabilisers to cut down on any Z wobble that might arise. One is currently printing out with an extra part to mount the Z limit switch to to cut down on clutter.
My largest print so far has been a platform to hold the sanguinololu electronics. Unfortunately about 2 hours into the 2 1/2 hour print, the leg on one of the brackets came undone from the bed and messed it up. Still, it is still a usable print and helps keep the electronics tidy. When I have some spare time away from printing (ie, when my hot end gives up next) I’m going to tidy up all the cabling and cut it to length.
The only mechanical part I’m still having trouble with is the small gear on the extruder. Due to it being above the heated bed, hotend, and on a hot stepper motor, the plastic heats up and warps a little, causing the gears grub screw to come loose and the extruder stops working. Not sure what can be done about this, but going to print a spare gear just in case!
I still have plenty of replacement parts that I want to build to improve this printer before moving onto my next. I definitely need to get a new X carriage as I’m having issues with it warming up and sagging too much. I want to print a new one that has a better arrangement of bearing points, and a couple of fan mounting points. I also want to print out an all in one Y axis to replace the one that I originally made as I drilled the holes slightly askew. It doesn’t influence the printing really, but I know its there and can notice it.
The current battle is going to be a long process of trial and error. The contest between reliable prints, fast prints, and high quality prints. I think its going to be a case of choose any two of these parameters, you can’t have all three! That being said, I have seen some videos of people who have got reliable, high quality prints out at a pretty high speed, so there is hope yet! I’ve also discovered that whilst Slic3r is a fantastic bit of software to get started with, it has some limitations going forward. One of which is if you have a tall thin object (or your print ends up with a tall thin part at the top) then Slic3r doesn’t slow down the printing and you end up with a horrible blob at the top. To this end, I’ve decided I need to learn how to use Skeinforge which is a much more featureful application. However, the interface is rather daunting. I will do a separate blog post on that later on.

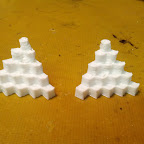
The top layers are very squished and don’t look good at all.
In other news, I have a Raspberry Pi, and it is running XBMC (or RaspBMC). I’m going to do the update on that as a separate blog post too, as I think I’ve waffled on enough here already.


Leave a Reply