Hobby electronic links

Since deciding to renew my interest in electronics over the past few months, I’ve tried various websites for supplying components and parts, along with some good sites for learning and ideas. I thought I’d do a quick write up of some of my favourites and put it all in one place.

Firstly, lets start with components. You will always need somewhere to get all your bits from, as well as tools and consumables. Here’s a few sites that I’ve found both handy and reliable. I do like to be able to get everything I need from one place, but I haven’t yet found a one stop shop for everything, but I have managed to narrow it down to just a few that will satisfy most of my needs.

  • Bitsbox – This is a great site to get your basic components from. They are cheap, well stocked, and have a nice simple website to use. You won’t find things like Arduinos, or Sparkfun kits, but you will find just about all the basics you could ever need. Components can be ordered in singles, or bulk, and delivery is pretty rapid. I tend to use Bitsbox to stock up on standard things like resistors, capacitors, common chips, and other non specialist components.
  • Proto-Pic – This is where you go for the more ‘building block’ style components. Things like Arduino, Sparkfun, sensors boards, breakout boards, etc. Great place with a nice easy to use website. I do find that I need to watch my spending here. It is too easy to keep loading up the basket with fun parts, especially shiny things like LEDs. There is a lot going on now in hobby electronics where you buy pre built component modules and link them up for a project, rather than scratch built circuits. Good communication from the staff here, and will part ship your order if they are having trouble with stock, instead of having you wait.
  • Cool Components – Very similar to Proto-Pic. You should be able to find what you want in one of these two stores. I’ve dealt more with Proto-Pic than Cool Components, but more for familiarity than any other reason.
  • Jeelabs – This is a slightly odd case, and is a more specialised shop than the rest. I’ve been working a lot with JeeNodes, and this is the place to source them from. Its a one man shop, but he is designer, builder, and shipper. He also provides a lot of information, not only on how to use his products, but also in general electronics knowledge.
  • Unmanned Tech – Not exactly in the electronics section, but this is where I get my quadcopter autopilot components from. I just wanted to mention it here because the support that is given is great. Very friendly and actually want to help.

Next, lets look information sites. These are places to go for learning more about electronics, techniques, and news.

  • Jeelabs Blog – As mentioned above, Jeelabs provides JeeNodes, along with other modules to go with them. The blog provides a lot of information about how to use their products, how they were designed, and also general information such as circuit design, how to improve your arduino sketches (especially making them low power), and walks you through good ways to measure and bug trace your own circuits. Well worth following.
  • EEVBlog – A great, fun blog by a mad aussie. (Are there any other types?!) He has a regular video blog on a fairly wide range of electronics subjects, including reviews on lab equipment, tear downs of new gadgets, and instructions on circuit design. He’s now making a living from this blog after having many years work experience in electronics. Videos are released on a pretty frequent basis and are well worth a watch just for his enthusiasm!
  • Instructables – This site is just fantastic. People from all over the world with a passion for making things can upload full build instructions to this site for all to read and reproduce. Its not just electronics here either! Anything that involves making things can be found here, from needle work to metal work! The information is free, but it is worth signing up for a full members account which allows you to view the instructables in a single page, rather than multi-page, and also download it as a PDF. Handy for putting onto an e-reader or similar. Great place to look for ideas for projects, or help on something you’re working on.
  • Makezine – Makers are taking over, and this is the place that pretty much summarises the movement.
  • Thingiverse – If you have a 3d printer, laser cutter, or cnc mill (or at least access to one), then you can find many actual objects available to download to be produced. The idea being, if you need something, and design it, you can then upload it to this site for anyone else to produce for themselves. An open source object library.

Thats it for the main part. A few honourable mentions go to RepRap for all your 3d printing needs, and also Youtube. There are many many videos there that are well worth a watch.
 

3d Roadblocks

Okay, its been a little longer than I hoped for for an update, but it has been Christmas so I’m using that as an excuse.

The build of the huxley was going very nicely until I hit a few snags with the kit I’d ordered. Firstly, there are nowhere near enough nuts, bolts and washers provided to complete the kit. I ran out before I’d even finished the frame, let alone mounted the motors, built the extruder, or made the idlers. Huxley

Secondly, the belt for the X axis was too short, so I couldn’t fit that.

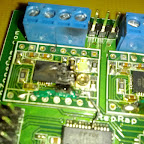
Thirdly, the electronics actually burst into flames on me whilst testing and configuring the motors. This was before I’d actually done anything bar plug the power supply in. To say I wasn’t impressed doesn’t quite cut it! Oh, and the analogue to digital converter for the hotend was missing.

So, considering I got a kit for hassle free construction of my first printer, I’m not overly enamoured with it. The UK company have put me in touch with the manufacturer to get things sorted, and they have said they will send out the replacement/missing parts from the states, so hopefully things will get sorted, but I could’ve had a nice working 3d printer by Christmas had everything been right in the first place. The instructions on the wiki also leave a lot to be desired, especially the hotend page, which were for a totally different design. Only one photo showed the model I’d got.

In the meantime, whilst waiting for the replacement parts, I’ve done some research into the electronics available for the various reprap machines, and have decided to build my own electronics based on the generation 7 schematics on the wiki. These electronics all fit onto a single sided PCB, so nothing complicated, and seem to be relatively simple. In fact, I bought a pre-made board off eBay, and had most of the other electronics already ‘in stock’ in my cellar. The gen 7 boards also use pluggable stepper motor drivers, which mean that if one does burn out, then you can simply plug another one in, unlike the kit electronics where everything is surface mounted and impossible to replace.

With all this, I’m hoping I can get a chance this weekend to finish off the electronics and get the main body of the printer working. I’ve built the extruder, mounted the motors, and got all the belts on, so all that is left is the calibrate and level it all, and build the hotend. I’m hoping the hotend will be fairly straight forward, but as I’ve no real instructions, just one picture to go off, I’m going to be very careful!

Anyway, here’s some pictures!

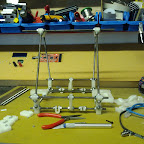
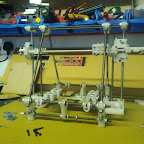
Huxley

Main frame

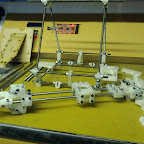
Huxley

X Axis

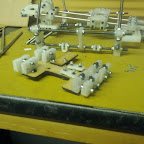
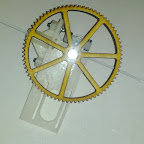
Huxley

Y Axis

Huxley

Y Axis in place

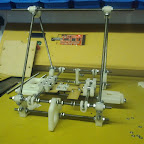
Huxley

X and Z Axis in place

Huxley

Extruder


In other news, I’ve been rather impressed with how easy Google SketchUp is to use. I’ve been messing around with it to design the parts for me printed quadcopter. For a beginner who just wants to make simple parts to be printed on a reprap, it is perfect. Install the plugin for exporting to STL files, and you can both upload these to thingiverse, and import into most of the 3d printer software that is available for the repraps.

Also, slightly related, I’ve actually had a quadcopter flying with the Arducopter controller. It was only a brief test as I managed to crash it and shatter 3 of the blades. Spare blades only arrived on Christmas eve, so not had a chance to do much more with it. Just waiting for some better weather so I can fly it outdoors. I’ve managed to snag myself and OpenPilot Copter Control board too last week which should be arriving any day. This is a halfway house between a simple KK Multicopter controller, and the full blown ArduPilot Mega. I’ve got the APM telemetry kit coming soon too, so I can take my laptop and get live telemetry from my quadcopter. Unfortunately, my laptop battery has developed a fault, so the only way I’ll be able to do that at the moment is if I can fly it somewhere with a power socket nearby!

So, hopefully next week I’ll be reporting that my printer is done, and will at least have done a couple of nice test prints. I think my first actual things to be printed will be brackets and improvements to the printer tho’.

The construction begins…

Two parcels arrived this morning, one a 2.3kg reel of 3mm ABS filament, the other was a surprisingly small box full of plastic and metal. Otherwise known as a RepRap Huxley 3d printer! A little over 3 weeks past the expected delivery date, but at least its here now.

Unfortunately, work got in the way of me doing much, but an hour of my ADSL being broken over dinner meant I could at least open up and check the contents. I must say, it is smaller than I was expecting, but thats a good thing. This should fit nicely on my desk and not take up too much room. The box contains everything you need to build the printer, bar tools of course. This kit is actually an import from the states, sold through a UK company who I assume buy a load of these and then ship them out locally. It did come with a US power cord on the PSU, but for me that isn’t exactly a show stopper! No instructions are included, instead everything you need is online on a wiki, and in numerous videos supplied by other people who have built them and in true open source fashion, contributed back to the project. In this vein, I’m hopefully going to improve the instructions on the wiki a little. I’ve already spotted a few areas that could be improved.

Wonder how long this is going to take me!?

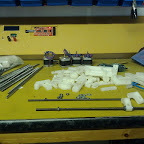
Huxley

Plastic parts, and metal rods.